These instructions describe what must be done for each PC that produces the digital image for one screen of your multi-screen display. They presume that you have already downloaded all necessary files described on the Downloads page.
Step 1: Install Unreal Tournament 2003
This merely requires that you follow the instructions that came with the Unreal Tournament 2003 download or disc.
Step 2: Install the Latest Code Patch
From whichever directory you saved it to, execute this file. It will find your UT2003 installation and modify it.
Step 3: Backup Specific Files
Installing CaveUT will change the following files in your C:/UT2003/system/ directory:
It's a good idea to make copies of them before you get started. In the unlikely event that installation of CaveUT corrupts your UT installation, you can always repair it by bringing these files back.
Step 4: Extract CaveUT Files
Extract these files from CaveUT2003.zip and copy them into your C:/UT2003/system directory.
Step 5: Edit UT2003/System/ut2003.ini
Make the following modifications to the ut2003.ini file:
Replace the line: "ServerPackages=UTClassic"
With this line: "ServerPackages=CaveUT"
Replace the line: "AllowDownloads=True"
With this line: "AllowDownloads=False"
You will notice three lines which look like this near the beginning of the file:
RenderDevice=D3DDrv.D3DRenderDevice
;RenderDevice=Engine.NullRenderDevice
;RenderDevice=OpenGLDrv.OpenGLRenderDevice
Put a semicolon in front of the first line and get rid of the semicolon in front of the third line, so they look like this:
;RenderDevice=D3DDrv.D3DRenderDevice
;RenderDevice=Engine.NullRenderDevice
RenderDevice=OpenGLDrv.OpenGLRenderDevice
When you save the file from your editor, be sure it writes the file in text-only mode. The "Notepad" editor in Windows is fairly safe and easy this way.
Step 6: Set Up a Connection Shortcut
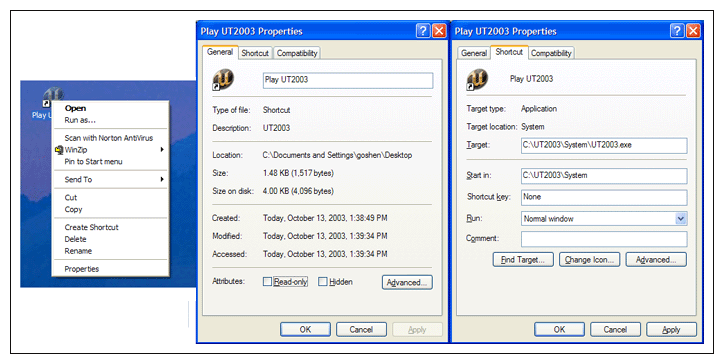
Create a shortcut to UT2003.exe and put it on the client's desktop, in the Start menu directory, or wherever it best serves your needs.
Right-Click on the shortcut to get a pop-up menu.
Go to the bottom of that menu and select "properties". You will get a dialogue box with three tabs.
Select the "Shortcut" tab.

|
In the textbox "Target", you will see the full pathname to the UT2003 executable. Copy and paste (or type) a single space onto the end of the pathname and then the following text:
127.0.0.1?spectatoronly=true?quickstart=true
So the whole line would look like this, except that it doesn't all show in the textbox:
C:\UT2003\System\UT2003.exe 127.0.0.1?spectatoronly=true?quickstart=true
Replace the local IP address, 127.0.0.1, in the "Target" dialogue box with the IP address for your server machine. If you do not know what this means or how to use it, contact your network administrator.
 Step 7: Set the Video Options
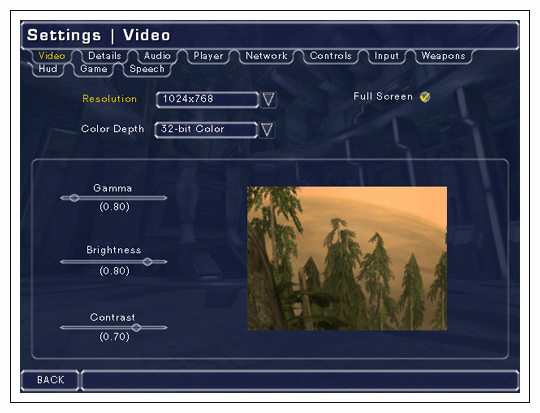
Launch UT2003 via its shortcut in the Start Menu. From the initial main menu, click on "Settings" to get the settings menu shown below. The tabs along the top let you change the screen to access different groups of settings. It usually defaults to the video settings, which is convenient.
Set the color depth to 32, or OpenGL will give you lots of nasty flashing polygons effects.
Set the screen resolution to whatever your projector (or whatever) can handle.
There are no hard and fast rules for further adjustment of the video options; you should experiment with the other settings until the video projection suits your tastes, preferences, and purposes.
Step 8: Make Sure the Sound Is Turned Off
In a typical CaveUT installation, you only want the server machine to be producing the sound effect. Otherwise you get a cacophony of sound effects, most of which are the same sound, but with each machine slightly out of phase with the server.
The simplest way to disable unwanted sound sources is simply not to plug in any speakers. You can also turn each client computer's sound off.
Otherwise, you can click on the "Audio" tab in the settings panel and set all the volume sliders to zero.
|
|