II: Install and Configure the Server
Step 0: Make sure your server PC has a static IP address.
If you have the server and all the clients pluged into an unmanaged hub or network switch, then you have to set their IP addresses manually, anyway. If you do not know how to handle PC networking, go find someone who does. It's simple, but not intuitive.
Steps 1-5: Follow Steps One Through Five of the Installation Instructions for a Client Machine (Previous Page)
But do not repeat Steps Six or Seven from those instructions; do not modify the file CaveUT.ini.
Step 6: (Optional) Edit User.ini
In the file User.ini, change the line reading "Bob=0.????" to "Bob=0".
This will turn off the bouncing effect players experience while navigating UT2003's "walk" mode. (The bouncing effect is not in time with any reasonable walking speed, nor is it the way we visually experience walking. For most uses of CaveUT, it serves best if disabled.)
Step 7: Start UT2003
Double-click on the program's desktop icon (if it has one) or launch it from the "Start" menu.
Step 8: Prepare to Change the Video and Control Settings
From the main menu, select "Settings."
Step 9: Set the Video Options
Do this in exactly the same way as you did for the clients' setup, but this time it is only for the CaveUT operator's viewing pleasure -- the server machine will essetentially be the control panel.
A helpful trick: You can often get away with the server PC being slower than the client machines. Just set the screen resolution and color depth to mininimum values so the game runs quickly.
Step 10: Set the Control Options
Click on the "Controls" tab to reveal the settings for keyboard, mouse, and/or joystick controls. At the moment you should probably leave these alone, but you will need to come back to this screen later to customize the controls to your liking.
To get out of the settings menus, click the "back" button on the lower left corner of the screen.

Step 11: Setup for a Multi-Player Game
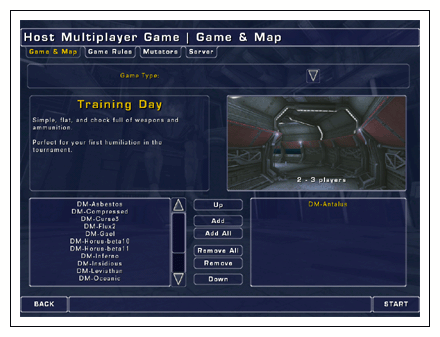
You should see a screen like the one to the right.
The bottom portion of this screen is used to select the virtual world you will be using. The default is DM-Antalus, which is a visually appealing setting whose naturalistic shapes tend to cover up flaws in the display. When you start calibrating your CaveUT-based display, you should switch to a more demanding virtual world, such as DM-TrainingDay or DM-Serpentine (calibrating more difficult worlds ensures that your CaveUT implementation is up to the demands of any virtual setting).
|

Step 12: Click On the "Server" Tab
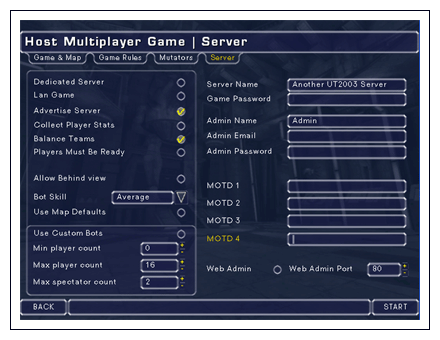
You should now see the screen to the right.
Go to the lower-left area of the screen and increase the "Max Spectator Count" to some high number, like 20. You only need as many spectators as you have screens on your display, but having a higher max affects nothing and might save you trouble
some day.
|
Example
If a the UT2003 game server is already supporting the maximum number of spectators and another tries to connect, the would-be-spectator's display will offer up the cryptic error message "Connection Refused by Server" and do nothing else.
This could happen, for instance, if someone were to set up a four-walled display with CaveUT but first test it on only two wall. He leaves the maximum number of spectators at 2 for the test, because that's all he needs. When the test is successfully completed, he sets up the other two walls but forgets to set max-spectators to 4. Once the first and second screens' clients are connected to the server, the server will refuse the third and forth until the max-spectators value is set higher and the server is restarted. |
(For some strange reason, changing the "MaxSpectators" variable in the "UT2003.ini" does not work.)
In addition, you should click on the "Lan Game" checkbox, to improve your network performance.

Step 13: Click On the "Mutators" Tab
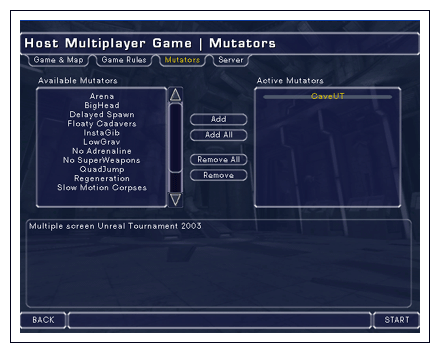
Select the CaveUT mutator by clicking on "CaveUT" on the list in the left side box, then clicking on the "Add" button in the middle. When you are done, the screen should look as it does, below. At this stage, don't use any other mutators. Most should work with CaveUT, but some may conflict. Get your CaveUT installation working and stable before you try other mutators.
|

Step 14: Set the Time Limit for the Game
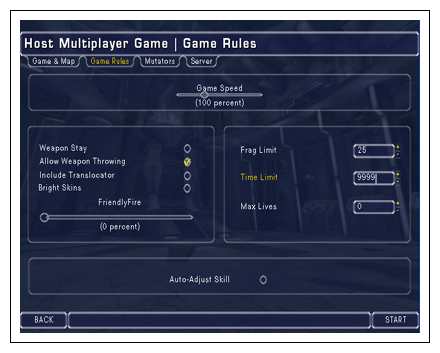
Click on the "Game Rules" tab, and set the "Time Limit" to the highest number you can, which is 9999. That is the number of minutes the server will allow the game to run before it kills the one server player and restarts the game.
|
The installation is now complete. At this point, you can start the server by pressing the "start" button in the lower-right hand corner, or start it up later, per the instructions on tne next page.
Last updated January 16, 2004.
URL: http://www.planetjeff.net/ut/CUTInstall2.html
This page is copyright © 2004 by Jeffrey Jacobson.
See this web site's copyright notice for information
on duplicating or distributing this page or its contents.
|
|


